

You voted.
(wait... you didn't vote?? Voting happened over on the BLB Facebook page. Make sure you're a fan!)
So, here's the tutorial.
Cupcake Gift Box!

I first saw these at my soon to be sister-in-law's wedding shower.
The favor was a delicious cupcake, given in adorable boxes that were handmade!
The most genius part about the whole thing is the insert that keeps the cupcake from sliding around inside.
No frosting mishaps!

As soon as I got home, I took the box apart and figured out how to put it back together.
I thought you'd all appreciate that.
Right?
So, here it is.
Supplies Needed:
~ 3 pieces of 8 1/2" x 11" scrapbook paper (coordinating colors)
~ pencil and ruler
~ double sided tape and regular tape
~ compass (you know... the thing that helps you draw circles)
~ scissors
~ 13" ribbon
~ embellishments for top
Tutorial:
Bottom of Box:
1. Cut paper to be 8 3/4" x 10 1/4"
2. Divide the paper into thirds 3 1/4" in from each side.

*** Important: Use pencil instead of permanent marker. I used marker so you'd be able to see the lines.
3. Divide into thirds again - 2 5/8" in from each side.

4. Measure 1/2" in from the edges on the middle square and cut the tabs off.

5. Cut up to the line you made for the first set of thirds and fold the middle sections in.

6. Fold in the sides as shown.

7. Use double sided tape to tape in the sides of the box.

8. Then fold up the middle sections and tape again.

Bottom of the box is done!
Lid to the Box:
1. Cut another piece of paper 7 1/2" x 10 1/2"
2. Divide into thirds 1 15/16" in from the sides (this is one tiny mark before the 2") :)

3. Divide into thirds again 3 3/8" in from the sides.

4. Make the middle tabs 1 3/8" in from the edge.

5. Cut off the tabs.

6. Cut up to the third line and fold in middle sections.

7. Then fold in sides as shown.

8. Use tape to secure the sides to make the beginning of the lid.

9. Fold up the middle sections and secure.

10. Take your ribbon and tape inside the lid, wrap around the outside, and secure on the inside with tape.


 |
| When you use pencil instead of permanent marker, your lines won't show through like mine did. |
Lid is done!

Cupcake Holder Insert:
1. Cut a piece of paper 5" x 5"
2. Draw lines 3/4" in on all sides.

3. Draw lines from the corner to corner.

4. Use a compass set at 3 1/2cm and draw a circle in the middle where the lines cross.
Then cut the circle out.

5. Cut off the corners.
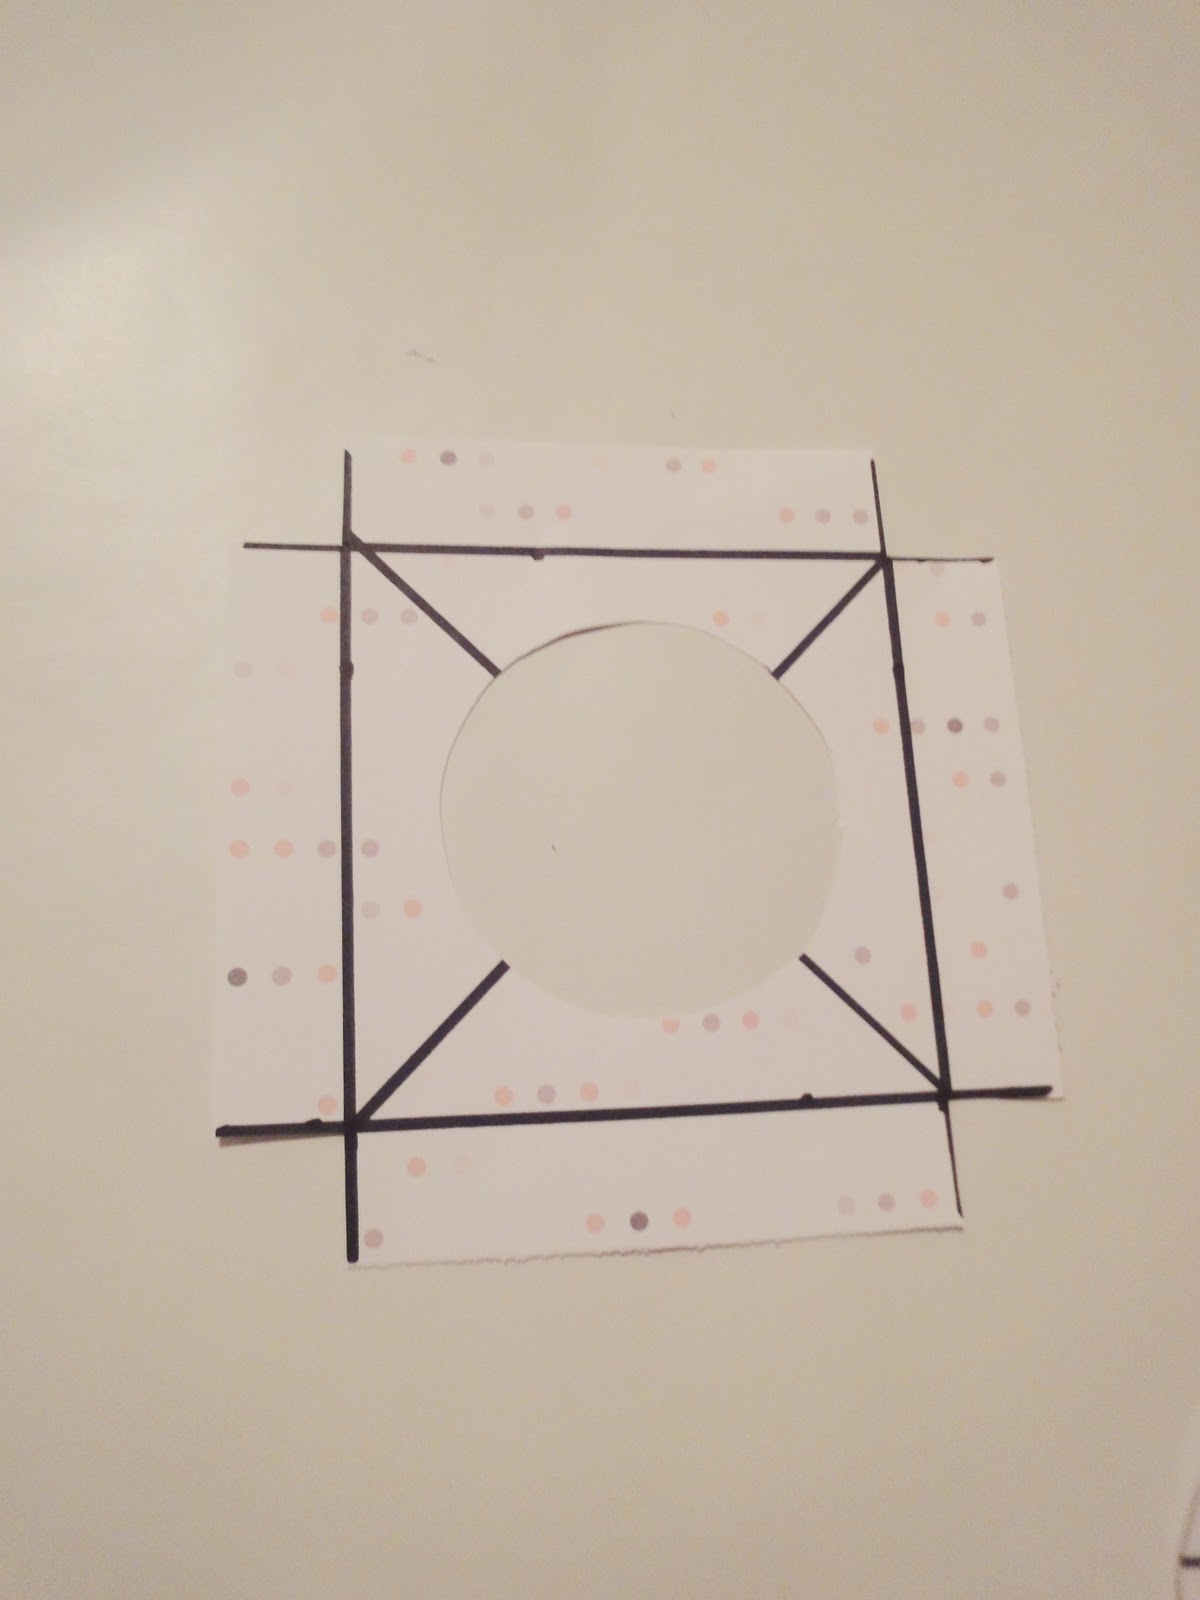
6. Fold the sides down to make a platform.

7. Place in the box - ready to hold a cupcake in place!
 |
| Again, be sure to use pencil so that you can erase your corner to corner lines! |
Decorate the top with an appropriate sticker, ribbon, etc...

And gift your cupcake to a friend!
Or make a bunch for your next party or ladies' night!
Perfect for Teacher gifts, too.
Such a cute idea!!!
ReplyDeleteThis is really cute, and looks like it would be fun to do as a group. Like 3 friends getting together to make these for a shower. And the cupcake inside looked good too!
ReplyDeleteThis is so going on my to-do list!! THANKS!
ReplyDeleteVery cute! I'll have to make one of these soon.
ReplyDeleteHi, I'm trying to make this box...but for materials needed, it says 8 1/2 x11 paper, but then for bottom of box, instruction #1, it says to cut the paper to 8 3/4 x 10 1/4....which of these measurements is off? Or am I totally missing something.
ReplyDeleteThe box is very cute though and I am making these for a friend's baby shower!
Oh dear... this is a problem, isn't it? Maybe I meant 8 1/4"?? I'm so sorry! If you decide to go through with making it, will you let me know what measurement ended up working? I'll have to redo this tutorial since it's been so long.
Delete