Showing posts with label Gift Ideas. Show all posts

Friday, May 18, 2012

Felt Alphabet Magnets {Tutorial}

I saw it first here.  And have been obsessed about them ever since.  I just knew that my children would learn their alphabet as soon as I made them!


So, make them I did.  And after 15 hours (YES - 15 hours - 2 car trips), they are finally done.

All 26 letters.


And I love them as much as I thought I would.

They were super simple to make, but if you don't have two seriously long car rides to spare, I might suggest just buying them on ETSY from some sellers who specialize in making them.  That is, unless you don't value your time - or just have extra to spare!


Making them consisted of printing out large, bold letters in the font of my choice on cardstock.

Cut around each letter and then cut the letter out twice in felt using my favorite sharp scissors.

Using a blanket stitch, stitch around both layers of each letter... stuffing with poly-fil as you go.  {I found using the sharp end of scissors helped to get the poly-fil in there tight.  And if you have a letter like "o" with an area in the middle - blanket stitch around the inside first.}.

Want to see a blanket stitch in action?  Watch this {and click over to the blog to watch if you are in email or a Reader}:


Apply a magnet with super glue to the back.


Attach to your fridge and watch as your kids magically learn all of their letters!  Of course they will learn them all - because I made them!


Linking to these fun parties:

Liz Marie Blog

Friday, May 4, 2012

Handmade Gifts - Wedding Party

The fun, crafty ladies at Crafterminds are having a Wedding... TODAY!  And I was invited to help contribute!

How fun is that?

Weddings have come SO FAR since I got married a short four years ago.  And bridesmaid gifts now-a-days?!  They are out of this world.  So much thought goes into the perfect gift for each bridesmaid that I thought it would be fun to do a round-up of some fun DIY and homemade gifts! 

1.  Monogram Mugs {easy to replicate this on your own}
2.  Lace Clutch using Heat Transfer Paper and Lace clip art!
3.  Homemade Bubble Bath with Free Labels
4.  Ruffle Clutch Tutorial - also has 3 other versions!
5.  Maid of Honor Emergency kit
6.  Personalized note inside a locket
7.  Bridesmaid Thank You Hankies


8.  Gift Box Idea for "the ask".
9.  Bridesmaid Survival Kits in Miniature Suitcases
10.  Bridesmaid Memory Box


Of course, I couldn't leave out my handmade shop: Better Life Bags!  Because I specialize in customizing each bag for each individual customer, I think these bags would make the perfect gift for any bridesmaid!  I just finished up a special order for a bride who wanted each of her bridesmaids to receive a bag designed just for them!  Designing with BLB really creates a unique and one-of-a-kind gift - and one that gives back 10% to those in need!

To get your marriage spiritually off on the right foot, consider subscribing to my blog to receive a FREE download set of 31 Days of Praying for Your Husband.  {just email me at betterlifebags@gmail.com to get them!}

Also consider the FREE $20 gift card offer from My Publisher to create a special and individualize photo book for each of your bridesmaids.

And for some wedding entertainment... How to Get a Toddler Ready for a Wedding

 
Check out more the Crafterminds Wedding with all sorts of different topics and ideas:
 

Wednesday, April 25, 2012

Doily Crafts and Decor

A quick look around my home will show a love for all things doily.  Yes, the delicate lace once used underneath lamps and on the back of lazyboy chairs.

Not anymore.  I bring you my latest doily craft along with a round up of 11 modern ways to use doilies in your home.

Source
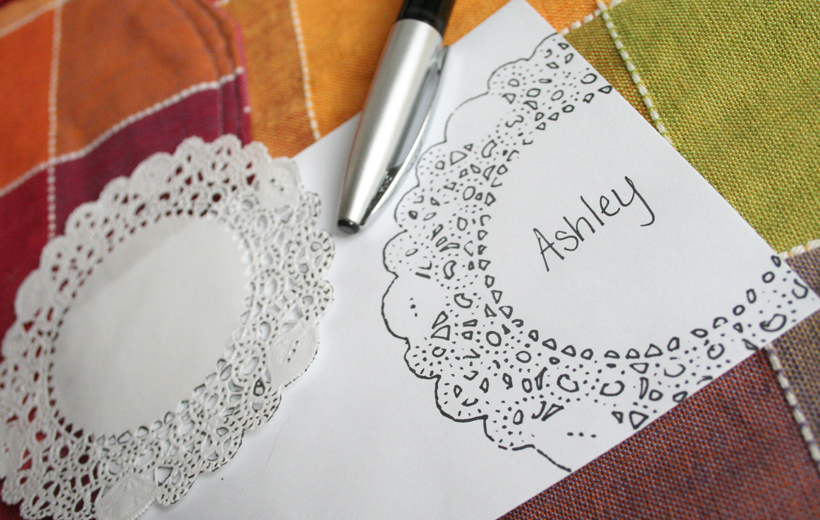
 I was sending a letter inside a package and thought the envelope was too plain.  It was.  So, I took a paper doily that used in Clara's Pinterest Inspired Birthday Party and laid it over the corner of the white envelope.  Using a thin Sharpie, I traced inside each of the holes.  A short few minutes later, I had a sweet embellished envelope.

 Much cuter.

Here are a few more ideas for how to decorate and craft using doilies from some of my blogging friends.  They sure aren't your Grandma's decor anymore!

Doily Frame, Footstool, Flower Pin, Candle Holders, Wreath, Doily Pillow


  A few from around my house...

Doily Wrapped Prayer Cards, JOY letters, Spray Painted Donut Boxes, Framed Doilies


Seen any good ones on Pinterest?


PS - I'm introducing myself over on PB&J Stories today.  She has a great ETSY shop full of wonderful handpainted wood signs.  Swoon...  see?


Thursday, April 5, 2012

Pregnancy Prayer Card Gift Idea

This month, I decided to put up a Better Life Bag button on Ashley's blog, Under the Sycamore.  Her blog captivates me every time I visit and after a few years of reading every day, I decided to take the plunge and advertise on her site.  Why not advertise on the sites that I love, right?

As a thank you, I wanted to send her my Pregnancy Prayer Cards.  She is in the process of adopting from China, and while her baby already has all her parts formed, I thought these might help to pass the waiting and focus her prayers.

I bundled them up with a paper doily folded over the pack and some red twine wrapped horizontally and vertically to keep the cards nice and tight in the mail.


Then, I tied a simple To/From tag on for an added touch.  Really simple.


Pregnancy Prayer Cards can be ordered here for those interested.

Monday, February 27, 2012

Embellished Glitter Paper Clips {a video tutorial}

This is a first for me.  A video tutorial.  I made these fun little paper clips to attach my business cards to your orders and thought it would be fun to share how to make them... in video form!


I DREAD taking tutorial photos.  HATE it.  And then I thought of my cute little Panasonic video camera.  Bought a tabletop tripod at Target and went for it!

Let me know what you think!


So?  Want to see more videos in the future?

I may (or may not ) have done my nails especially for you.  {wink, wink}

And for your pinning convenience... a few more pinnable images ;)


Wednesday, February 8, 2012

Quick, Cheap Valentine Gifts

Don't forget to enter your Pinterest Projects into the Challenge!  Link Party closes Sunday at midnight then voting opens for the awesome prize package.

Also, check out Bev's amazing pinterest project she posted yesterday.  This girl can embroider!  And Amanda is sharing her big reveal today!  Leave them some Better Life Love in the form of comments and followers!

Now... on to today's post...
----------------------------------------------------------------------------------------------------------------------------

Coming up with fun, creative Valentines for my sweetie are always fun for me.  And now, with Pinterest, it's even easier!  Over Christmas, I pinned this mustache mug to make as a gift.  I never got around to it, but remembered it last week and thought adding a sweet set of red lips would make the perfect pair!

Thanks to my Silhouette, it was super easy!  Just purchased an image and cut it out of black and red vinyl.  We've had a blast using them!


A few years ago I made this for my hubby for Valentine's Day.  It was perfect because he LOVE Swedish Fish and I LOVE him.  We unfortunately ate all three pounds of Swedish Fish in a matter of a few days.  Whoops.


It's super easy to make.  I had this fish bowl shaped candy dish on hand, but it might be even more fun to go buy a NEW fishbowl at the pet store!

I dumped a large box of Nerd in the bottom to resemble fish gravel and then piled up the Swedish Fish!

The stickers were from Target's dollar sticker section (near the school supplies), so this all made for a cheap Valentine gift that my hubby LOVED.

Don't forget to follow me on Pinterest so you can see all the cool ideas and crafts I'm posting to my "Love Your Husband" board!  Great inspiration in there as well as book suggestions you all gave me on the Facebook page last week.


BLB of the day: 


Save 10% with BAGOFTHEDAY {good only on this bag until midnight on date of blog post}

Friday, January 20, 2012

simple embroidery tutorial

I am participating in a Journal Swap this week.  It's been really fun to dream up a journal cover to make for my partner (maybe it's you!).  After creating the cover (which I can't show you until the big link party over at Aleks Handmade), I decided it needed a little embellishing in the form of hand stitched embroidery.

I picked one of my favorite Bible verses and went to town.


Embroidering is so simple and the results are so cute.  I've seen so many cute tea towels, wall hangings, and more on Pinterest using embroidery.

Want to know how to do it?  I can't speak for all those more intricate designs, but "writing" something with embroidery is fairly easy.  Here's how:

For this project I used three strands of embroidery thread and a regular needle.  {I think the standard needlepoint and embroidery projects use 2 strands of thread.  My material was just a little plush and I wanted it to stand out.}

1. Thread the needle and knot the end.  Using a pencil, lightly write the word/saying you want to embroider.  {the picture below says "plans" right next to the pencil tip}


2.  Using your threaded needle, make one stitch along your pencil mark.  {see the "l" below}.  Then, for the second stitch {and everyone after that}, come up the back side a little further from the last stitch.


3.  Put your needle back down through the fabric at the point where your last stitch ended.  This is called a "backstitch" because you are essentially stitching backward!


Do the same "backstitch" while you follow along your pencil marks.  Eventually you will end up with a sweet saying written in thread!  And the fact that my stitching isn't perfect {a little wonky actually} just gives the finished product more of a handmade feel!

Seriously... get on Pinterest and search for "embroidery" {after you pin THIS tutorial to your boards, of course}.  There are some INCREDIBLE pieces out there.

I think I may have a new obsession.  Watch out tea towels!


ps - I'm on twitter now.  Yes, I joined the group of tweet-freaks.  Follow me?  @betterlifebags

Linking this to Think Pink Sundays.

Friday, December 23, 2011

dollar king christmas

Today you can find me over at Honeybear Lane.  Sharing a little something I like to call:


Thursday, May 5, 2011

Create Your Own Subway Art with Wordle

Came across a fun site last night:


It allows you to enter a bunch of words and create your own Subway art!

If you have a blog, you can create a Wordle from words used on your blog!

One of our 31 Days to Clean challenges was to think about a mission statement for your home.

So, I wrote down a bunch of words that I wanted to embody my home.
Entered them into Wordle and let it create an art piece to remind me WHY I want a clean house!


Seriously, Wordle is SO GREAT.

It even let me pick the font, colors, layout, etc..
You'll have a BLAST playing around with the options.
ALL.
FOR.
FREE.

When you get it the way you like, just push print...
and out comes a perfect piece of art.


Maybe create one of these for your Mom... Mother's Day is on Sunday you know.


Or maybe your hubby needs some lovin' in the form of Subway Art.
Teacher Appreciation week is this week, too... any teacher would love this on his or her classroom wall!
And it only takes 5 minutes to make.

Head over to Wordle now and have some fun!
{tip: if you want certain words to be bigger than other, type that word multiple times.  The more times you type it into Wordle, the bigger the word will be.}
If you're joining me on the 31 Days to Clean Challenge,
I'd love to hear your mission statement for your home.
Leave me some comment love with it!
{beware... if I like some of your words, I might add them to my Wordle Art!}

I also found this FREE printable this week.


It was a good reminder that while I love decorating my home and fancying it up, what I love MOST about my home is my husband and children.
They come before any house project,
any renovation,
any cleaning frenzy.
{It's hard for me to remember that when laundry and dishes are screaming my name.  This will be a helpful reminder on my wall}

Download one for your house here.
The ladies from Eighteen25 have lots of color options to choose from!

Tuesday, April 26, 2011

FREE Mother's Day Gift Idea

Every six months or so, I print all of our family's digital photos into a photobook.

We LOVE looking through them.


Over and over.

{In fact, I usually wait until I can get a BOGO offer so I can have one copy the kids can look through without me having an anxiety attack.  I keep the other copy in the fire-proof safe.  Then someday they will each get a copy.}

I've been trying different photobook companies to figure out which one I like best.
{I LOVE photobooks so much that if she hadn't already done it, I'd probably start up a blog dedicated to them!}

So far my favorite {by far} is MyPublisher.

The covers are more of a matted look {and feel} instead of high gloss.
The pages feel thicker.
The colors are brighter.
And I love the ease of their program.
AND the variety of templates.
{all I do is drag and drop my pictures into the templates they already offer.  easy.}
And did you see how cute the box is that it arrives in?

And right now, you can get a hardcover 5.75" x 7.75" photobook FREE!

Here's how:
Click on this button to get a $20 gift card.

MyPublisher, Inc.

5.75" x 7.75"  Hardcover photobooks are $19.99, so all you have to do is pay for shipping.

I ordered mine last week.
And I couldn't be happier.


I think Little Bug liked it, too.  Even though he's drilling a picture of himself.
Bad hair day, maybe?


If you order yours before Thursday, April 28th it will be here in time for Mother's Day!
Trust me, you will NOT regret getting this.

And really, who can pass up a FREE photobook??
{If you don't use it for a Mother's Day gift, treat yourself!!}

Here's the link again:


MyPublisher, Inc.

Happy Designing!
Related Posts with Thumbnails